Inquire excel 2020
Inquire excel 2020
Большинство новинок уже оценено пользователями Excel 2013. Но тем не менее, всегда остается что-то интересное и, самое главное,нужное для работы.
Только обладатели набора приложений Office 2013 профессиональный плюс имеют возможность расширить возможности программы с помощью надстройки Inquire. Приятно, что эту надстройку нет необходимости дополнительно скачивать и устанавливать, она устанавливается вместе с Excel 2013.
Какие задачи нам помогут решать команды из надстройки Inquire?
- Сравнивать 2 версии книги. В результате можно легко отследить и посмотреть все изменения как по значениям, так и по форматированию.
- Посмотреть на структурной схеме зависимости как между данными разных листов, так и файлов.
- Проанализировать данные по множеству параметров. Например, скрытые листы, ошибки в формулах, зависимости между данными, обнаружить различные проблемы и другие данные, которые помогут анализировать данные текущего файла и принимать нужные решения.
Чтобы воспользоваться всеми преимуществами, необходимо включить надстройку:
-открыть Файл, выбрать Параметры, затем группу Надстройки
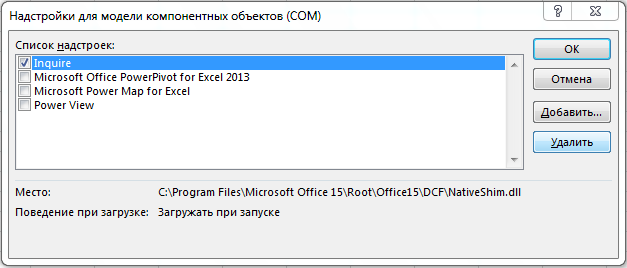
-списке Управление выбрать Надстройки COM и нажать кнопку Перейти

— выбрать в списке Inquire и нажать ОК. 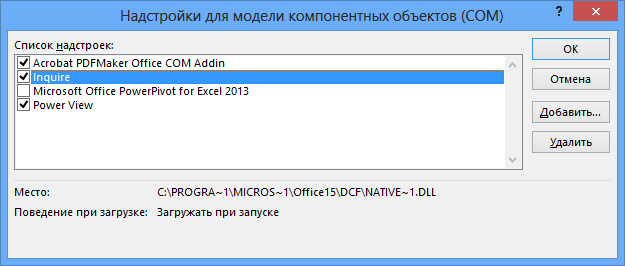
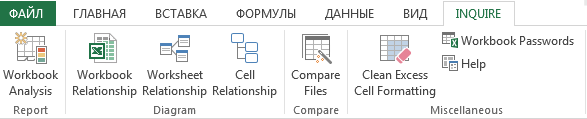
В результате появится новая вкладка INQUIRE со следующими командами:

 — СРАВНЕНИЕ ДВУХ ФАЙЛОВ.
Открыть оба сравниваемых файла. Нажать кнопку Compare Files.
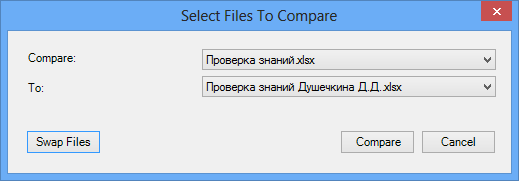
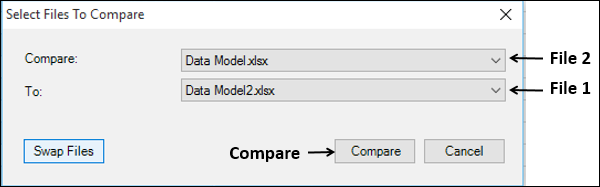
В окне Select Files to Compare выбрать 2 файла (кнопка Swap Files поменяет файлы местами между Compare и To), нажать кнопку Compare.
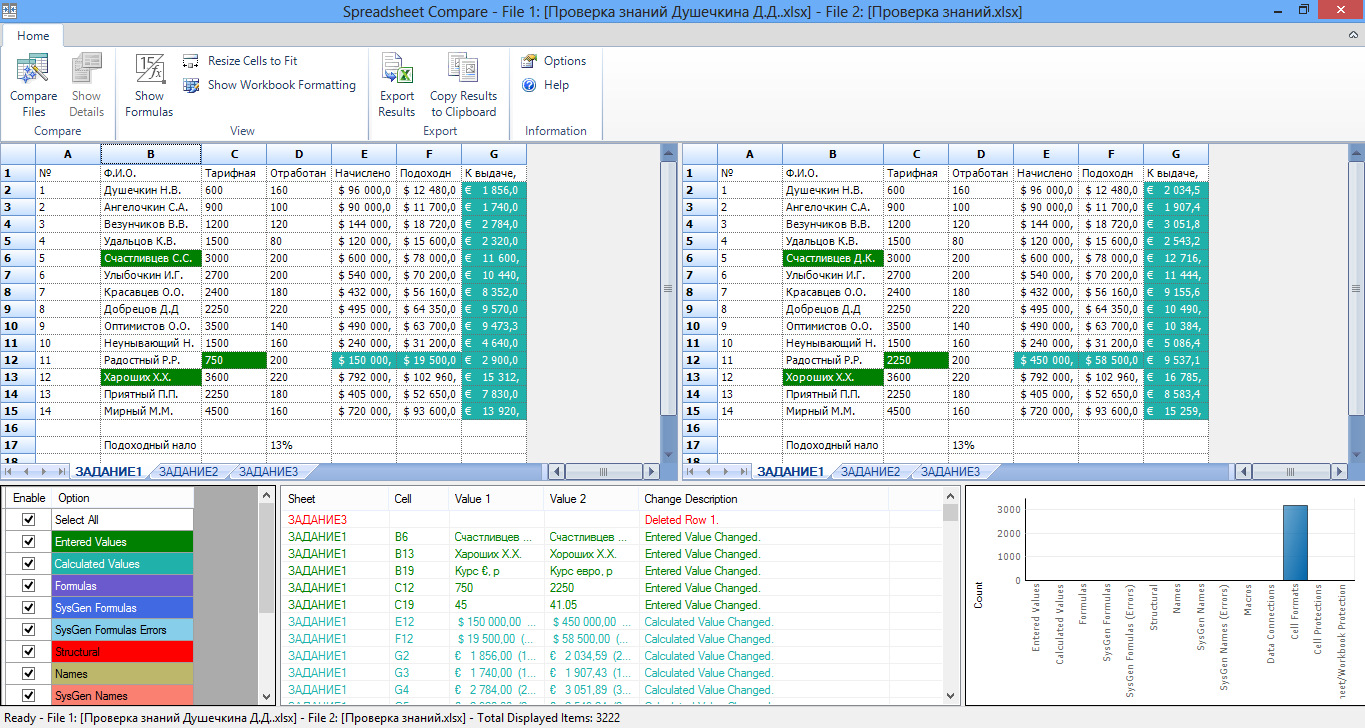
Результат сравнения будет выведен в отдельное окно:
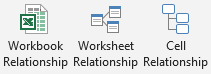 — ПРОСМОТР СВЯЗЕЙ между рабочими книгами (Workbook Relationship), рабочими листами (Worksheet Relationship), и ячейками листа (Cell Relationship).
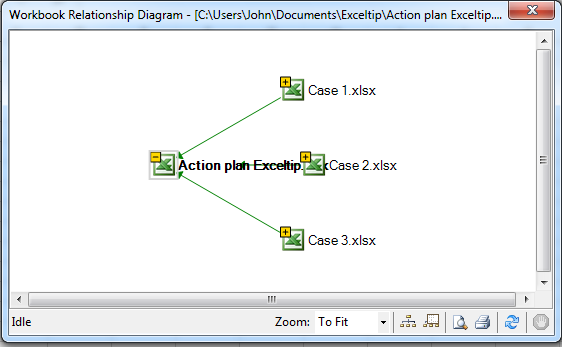
Например, структурная схема зависимостей рабочих книг:
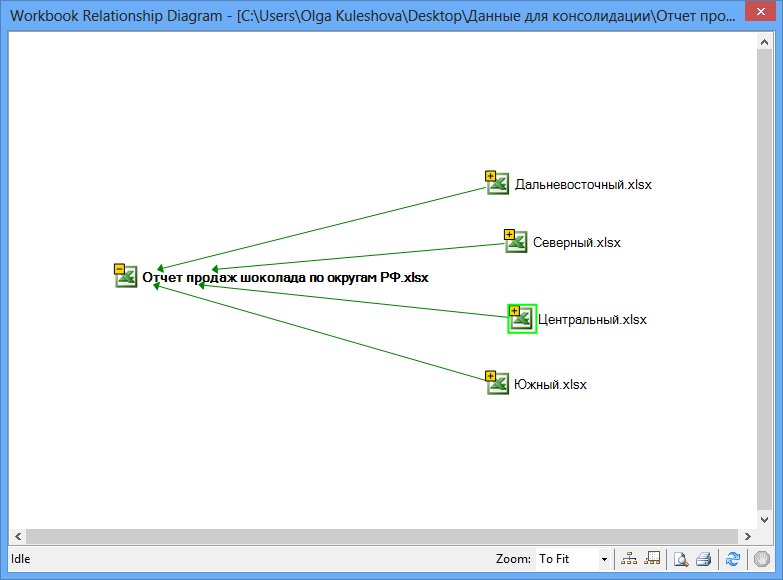
легко видеть какие данные консолидировались в отчет, но можно посмотреть или более подробно:
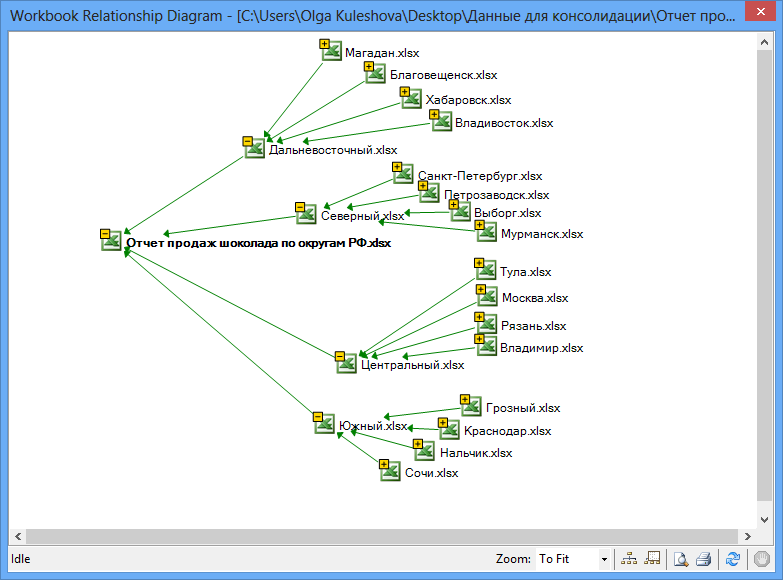
Данная схема легко позволяет видеть структуру (иерархию) взаимодействия данных, что облегчает понимания взаимодействия между файлами и способствует выявить ошибки.
 — АНАЛИЗ КНИГИ по множеству параметров.
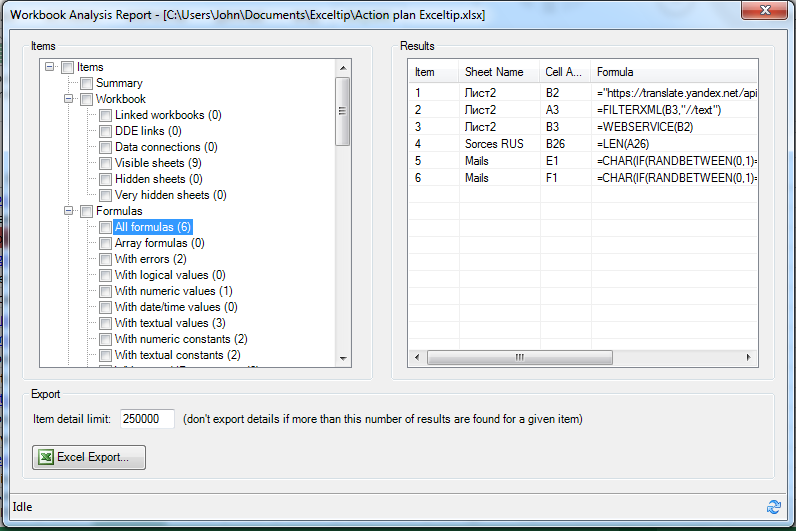
Нажав на кнопку Workbook Analysis, начинается работа по анализу книги. В области Items пользователь имеет возможность выбрать позиции по которым будет произведен анализ:
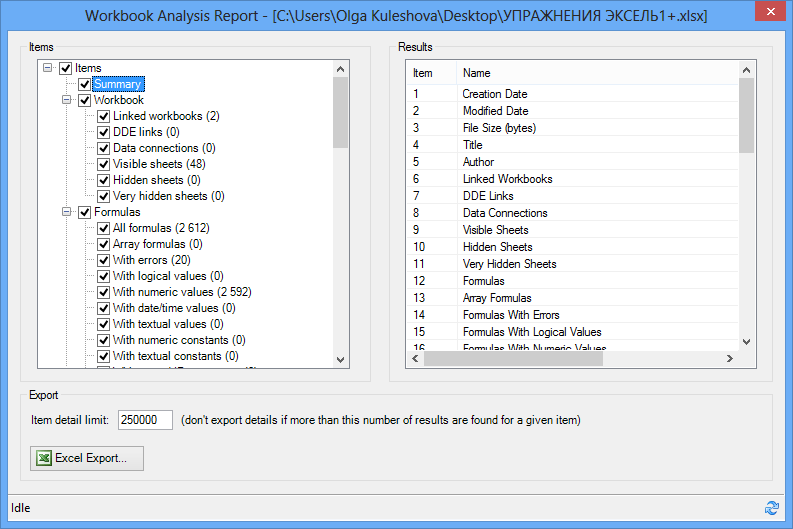
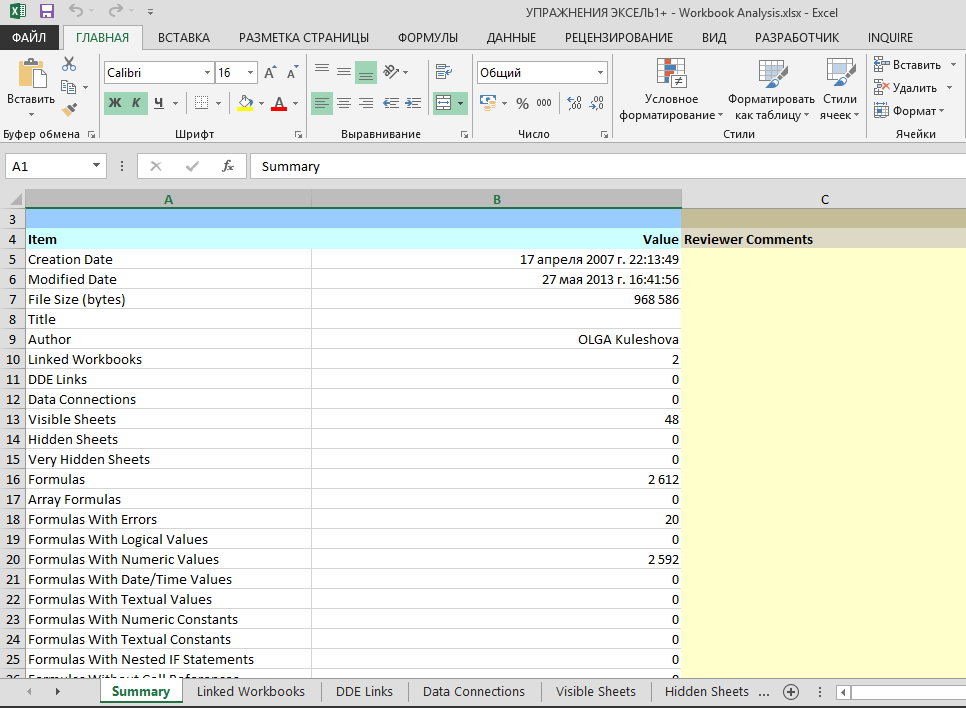
Кнопка Excel Export формирует отдельный файл-отчет:
Оставьте комментарий!
На сообщение “Надстройка Inquire в Excel 2013” комментария 24
Хорошие возможности! Я думаю, что многим они понравятся. Жаль, что у меня нет 2013 excel
Жаль, что до подобного они созрели только в 2013 версии
Мне очень понравилось сравнение файлов — сразу всё видно
Какие хорошие возможности! и как их «случайно» найти самой не представляю
сравнение 2-х файлов с применением Compare Files — это вещь!
Есть ли что-то подобное в предыдущих версиях программы?
Недавно меня попросили удивить чем-нибудь в excel. Я, не долго думая, и показала возможности этой надстройки. Начальник был крайне удивлен моими познаниями. Спасибо, вам, Ольга, благодаря вам я способна удивлять.
Несколько лет работаю в этой версии и даже не знал, что подобное есть. Как хорошо, что есть где прочесть. Спасибо, теперь часть задач в моей работе упростится
Для 2010 версии есть что-то подобное?
Надстройка сохранилась в 2016 версии?
Laura, только начиная с 2013 версии.
НаталиКо — да, есть и подключается как в 2013 версии
посмотреть взаимосвязь между файлами в такой схеме — это прекрасно!
Почему бы подобные команды сделать не в виде надстроек, а в виде обычных команд на вкладках.
Жаль, что анализ и построение структурной схемы происходит м-е-д-л-е-н-н-о
с одной стороны хорошие интересные возможности, но есть ощущение, словно «сырое» и «недоделанное»
Настройка кажется мне сырой. Ничего нового в ней не изменялось в 2016 версии?
Жаль, что не развивают такие полезные команды
Здравствуйте Ольга!
Помогите пожалуйста разобраться. На сколько мне известно, надстройка Inquire активна для версии Excel 365. Однако у меня в Параметрах — Надстройки COM её нет!((( С чем это может быть связано?
Обращаю Ваше внимание, что надстройки именно нет ещё на этапе Параметров. Настройки ленты тут не причем, я саму надстройку я не удалял.
Гамид, здравствуйте!
Inquire есть в Office Professional версий: 2013/2016/2019/Office 365 Pro Plus.
Может, у Вас более простая версия офиса 365?
Увидел о данной возможности здесь. Очень доволен — быстро нашлось решение по сравнению файлов. Почему о ней так «тихо» и её прячут?
Хорошая надстройка, но она в тени. Почти никто о ней не слышал
Excel Data Analysis — Inquire
You can use Inquire to −
- Compare two workbooks.
- Analyze a workbook for problems or inconsistencies.
- View the links between workbooks.
- View the links between worksheets.
- View the relationships between cells.
- Clean excess cell formatting.
- Manage passwords.
The INQUIRE tab will be on the Ribbon. If you find the INQUIRE tab on the Ribbon, you can skip to the next section.
If you do not find the INQUIRE tab on the Ribbon, make the Inquire Add-in active.
- Click File > Options.
- In Excel Options window, click on Add-Ins.
- In Manage box, click on COM Add-ins.
- Click Go.
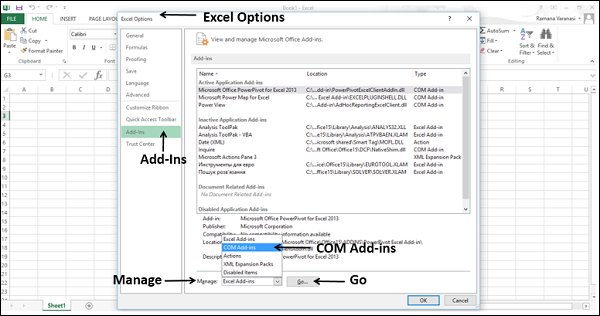
COM Add-Ins dialog box appears.
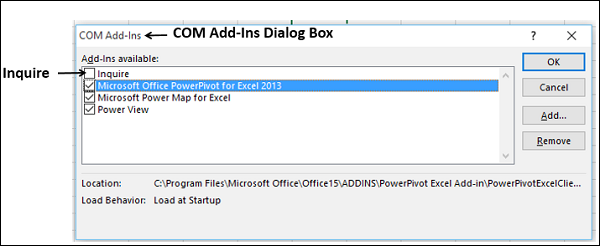
- Check the Inquire box.
- Click OK. Now, Inquire Add-In is active. You will find the INQUIRE tab on the Ribbon.
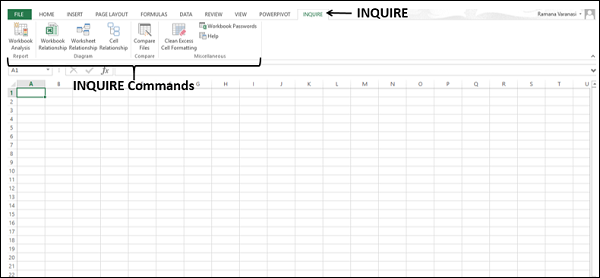
INQUIRE Commands
Let us learn about the INQUIRE commands.
Click the INQUIRE tab. You will find the following commands −
- Workbook Analysis
- Workbook Relationship
- Worksheet Relationship
- Cell Relationship
- Compare Files
- Clean Excess Cell Formatting
- Workbook Passwords
Comparing Two Workbooks
You can compare two workbooks cell by cell and find the differences, if any, in terms of changes in the second workbook as compared to the first.
Follow the below given steps −
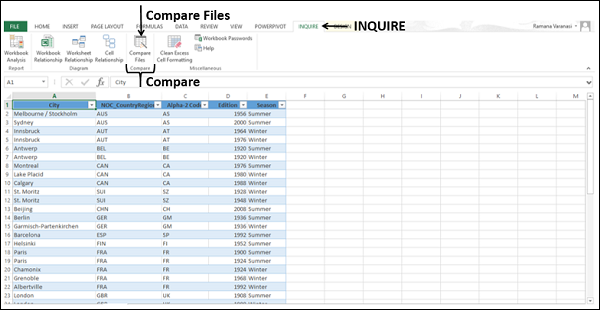
- Open two workbooks that you want to compare.
- Click on INQUIRE tab on the Ribbon.
- Click on Compare Files in the Compare group.
- The Select Files To Compare dialog box appears.
- Check the file names displayed in the boxes next to Compare and To.
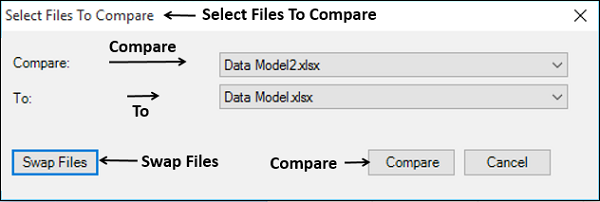
- If any File name that is displayed is not the one you wanted, click the down-arrow next to that File name.
Only the workbooks that are open will be displayed.
If the order is not OK, click Swap Files. The order of Files in Compare and To gets changed.
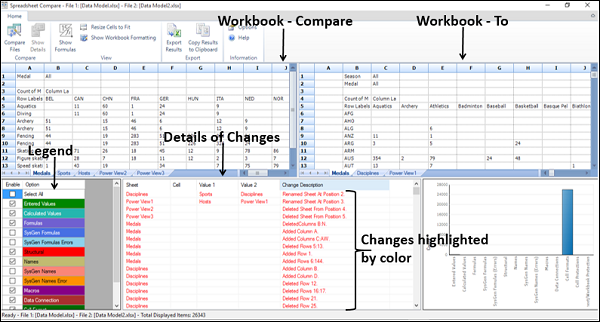
The results of the comparison appear in a two-pane grid −
- The workbook on the left corresponds to the «Compare» file you have chosen.
- The workbook on the right corresponds to the «To» file you have chosen.
Details of changes in workbook-To as compared to Workbook-Compare appear in a pane below these two grids. The changes are highlighted by color, depending on the kind of change. The legend for the highlight colors appears in the lower-left pane.
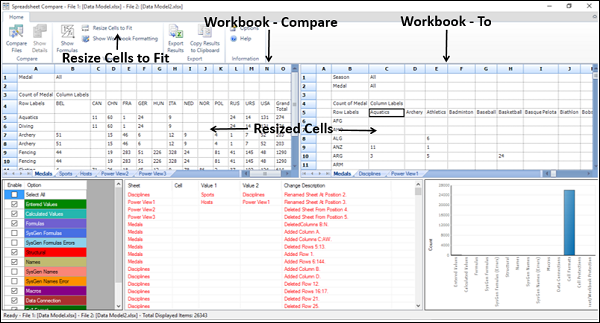
Click Resize Cells to Fit on the Ribbon to view the cell contents in the Compare and To workbooks. The cells in both the workbooks are resized so that the contents are visible.
Click the Export Results in the Export group on the Ribbon.
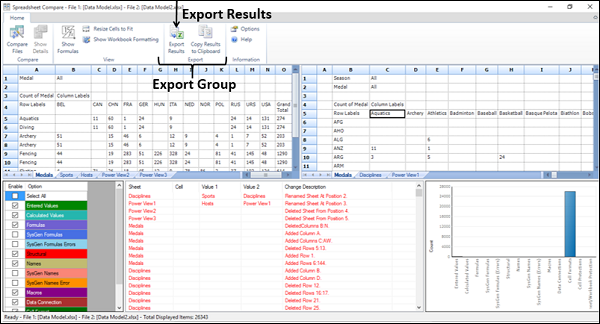
The Save As dialog box appears. You can save the results to an Excel workbook. Note that only .xlsx file type is available.
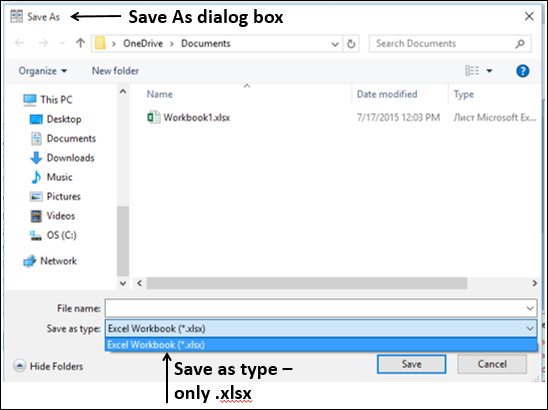
If you need the results in another application, you can do it by copying it to Clipboard.
Click Copy Results to Clipboard in the Export group on the Ribbon.
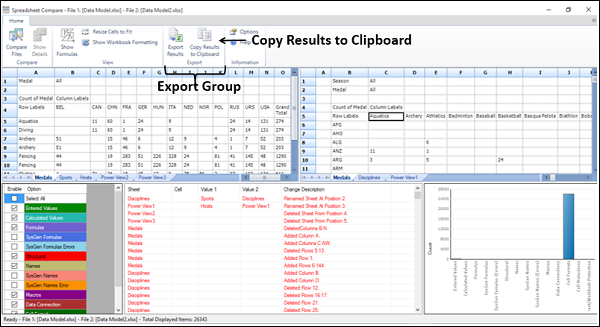
Paste in an application you want.
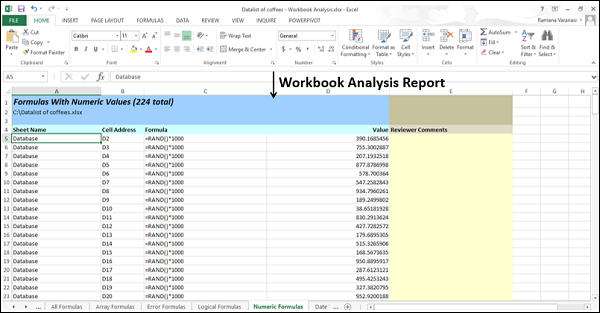
Creating an Interactive Report
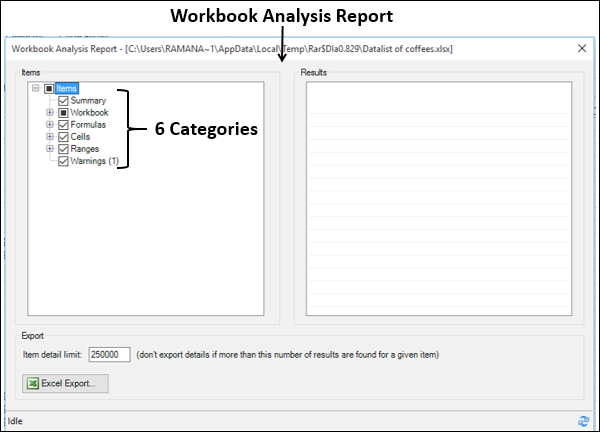
You can use the Workbook Analysis command to create an interactive report that can show detailed information about the workbook and its Structure, Formulas, Cells, Ranges and Warnings.
- Click the Inquire tab on the Ribbon.
- Click Workbook Analysis in the Report group.
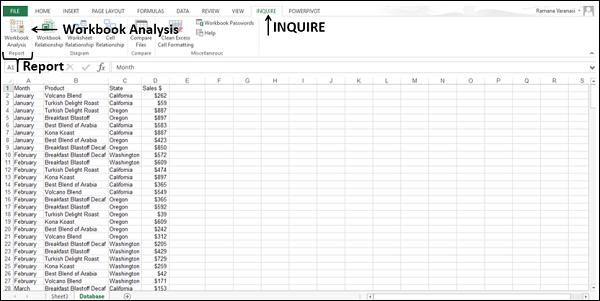
The report will be displayed after the Workbook Analysis is completed.

The Report has the following six categories −
Summary − General information about the structure and content of the workbook.
Workbook (with subcategories) − General workbook statistics.
Formulas (with subcategories) − Specific information about formulae in the workbook.
Cells (with subcategories) − Specific information about cells in the workbook.
Ranges (with subcategories) − Specific information about ranges in the workbook.
Warnings − Several types of warnings about workbook structure and content.
Selecting a category gives you more information about that category.
Check the Formulas option. The sub-categories of formulas will be displayed.
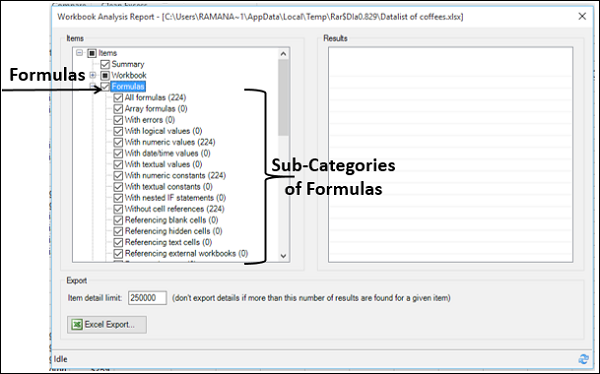
You will observe the following in the workbook that you are analyzing −
- All formulas are 224 in number.
- With numeric values, they are 224 in number.
- Click Sub-Category With numeric values.
In the Results pane, for each of the cells with formula with numeric values, worksheet name, cell address and formula are displayed.
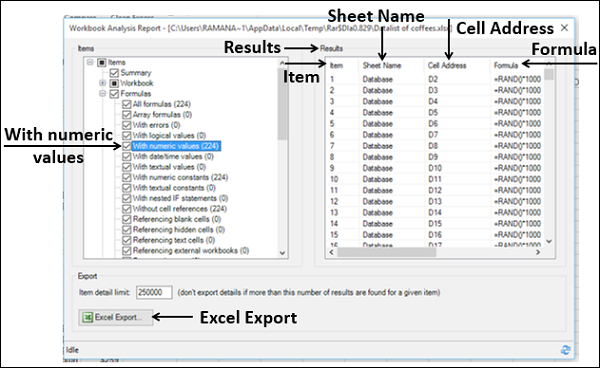
Click the Excel Export button. The Save As dialog box appears.
- Save the Report as an Excel file.
- Load Export File button appears next to Excel Export button.
- Click on Load Export File button.
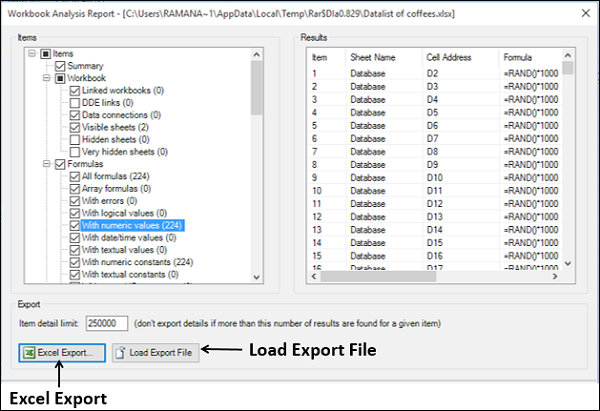
The saved Report Excel workbook opens and you can clearly view the workbook analysis results.
Viewing with Diagrams
You can view workbook relationships, worksheet relationships and cell relationships with interactive diagrams created by links. The links show the dependencies between the nodes in the diagram. You can drag the links or nodes to arrange them and align them to view whatever you are looking for.
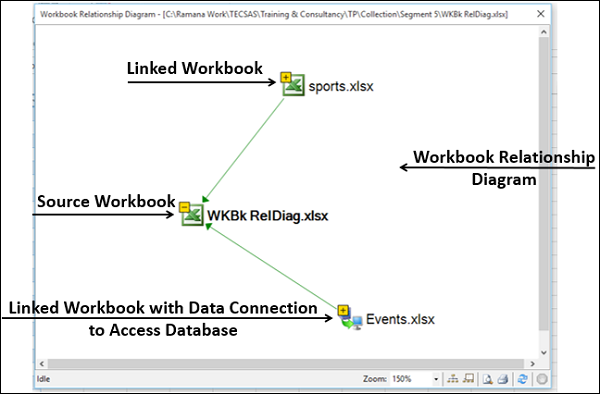
Viewing Workbook Relationships
You can have an interactive, graphical map of workbook dependencies created by connections (links) between files using workbook relationship diagram.
The types of links in the diagram can include other workbooks, Access databases, text files, HTML pages, SQL Server databases and other data sources.
- Click the INQUIRE tab on the Ribbon.
- Click Workbook Relationship in the Diagram group.
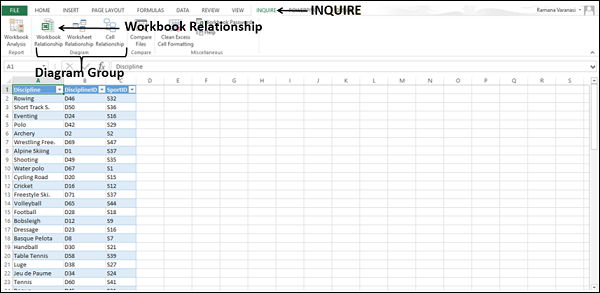
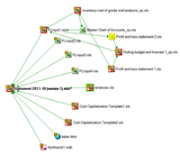
The Workbook Relationship Diagram appears, showing links of the workbook with different Data Sources.
Viewing Worksheet Relationships
You can use Worksheet Relationship Diagram to create an interactive, graphical map of connections (links) between worksheets in the same workbook and /or worksheets in other workbooks.
- Click the INQUIRE tab on the Ribbon.
- Click Worksheet Relationship in the Diagram group.
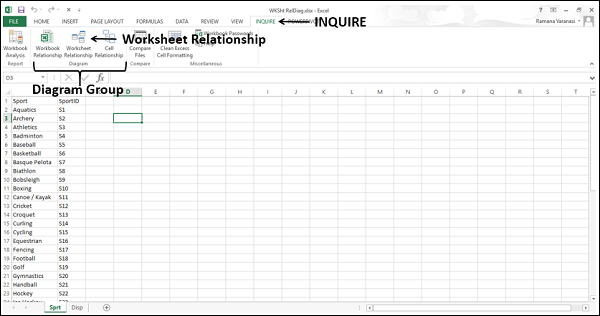
The Worksheet Relationship Diagram appears, showing links between the worksheets in the same workbook, and in other workbooks.
The difference between these two can be identified by the direction of the arrows.
![]()
![]()
Viewing Cell Relationships
You can use the Cell Relationship Diagram to get a detailed, interactive map of all links from a selected cell to cells in other worksheets or even other workbooks.
- Click the INQUIRE tab on the Ribbon.
- Click Cell Relationship in the Diagram group.
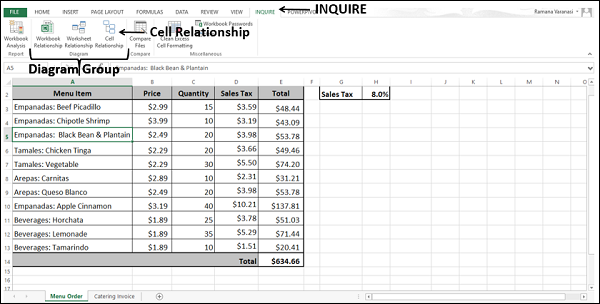
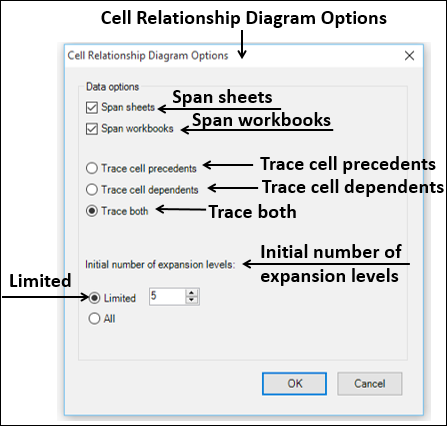
The Cell Relationship Diagram Options dialog box appears.
Check Span sheets and Span workbooks.
Select Trace both under Trace cell precedents and Trace cell dependents.
Under Initial number of expansion levels, select limited and type 5 in the box next to it.
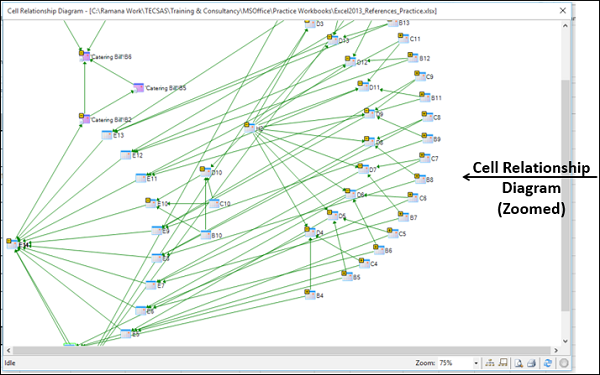
The Cell Relationship Diagram appears, showing links between the selected cell and the cells in the same worksheet, same workbook and in other workbooks, based on the options you have chosen.
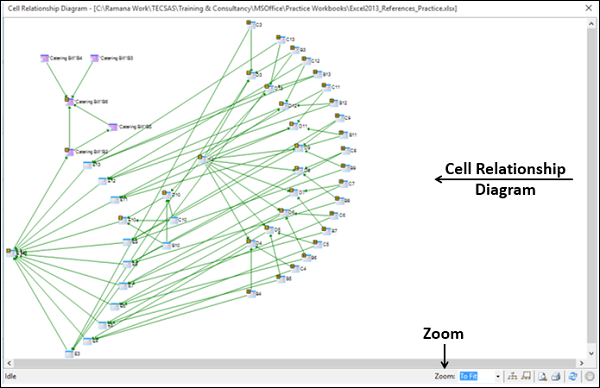
Click Zoom. You can view the nodes clearly.
Cleaning Excess Cell Formatting
When you find that a workbook is getting loaded slowly, or has become huge in size, it might have formatting applied to rows and/or columns that is not needed (for example, conditional formatting an entire column that has less than 15 values).
You can use the Clean Excess Cell Formatting command to remove excess formatting and greatly reduce the file size. This also results in improving Excel’s speed.
Before cleaning the excess cell formatting, create a backup copy of your Excel file because there are certain cases where this process may increase your file size, and there is no way to undo the change.
- Click the INQUIRE tab on the Ribbon.
- Click Clean Excess Cell Formatting in the Miscellaneous group.
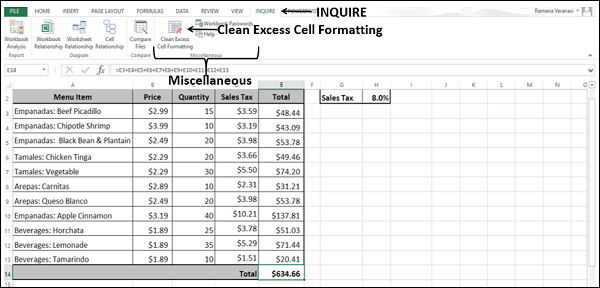
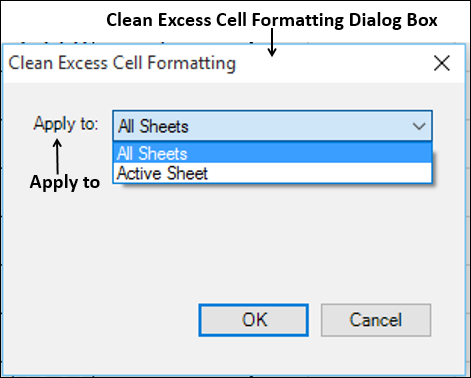
The Clean Excess Cell Formatting dialog box appears. Choose All Sheets in the Apply to box
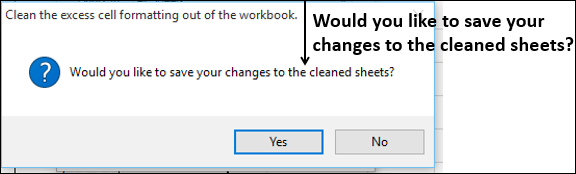
You will get a message about saving changes. Click OK.
Managing Passwords of Files
If you are using Workbook Analysis or Compare Files commands for workbooks that are password protected, you can avoid having to type the password each time those files are opened. This is possible with using Password Manager.
- Click the INQUIRE tab on the Ribbon.
- Click Workbook Passwords in the Miscellaneous group.
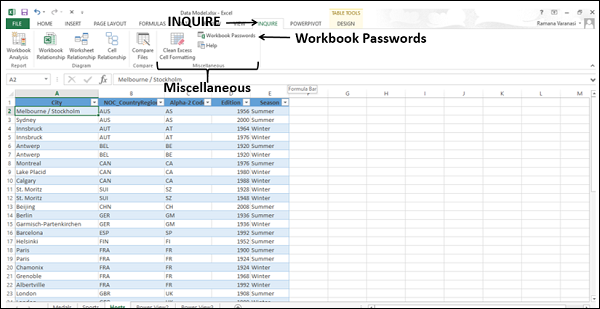
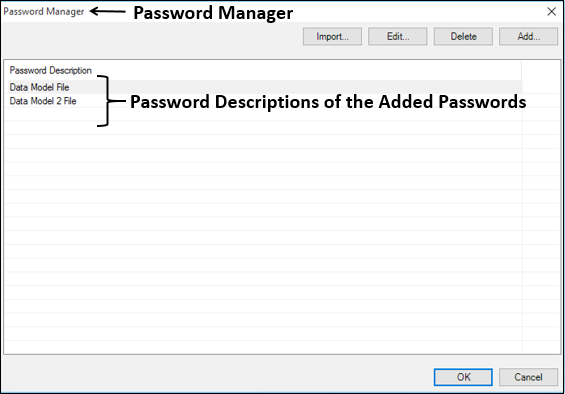
The Password Manager Dialog box appears. Click the Add button to add passwords of your workbooks.
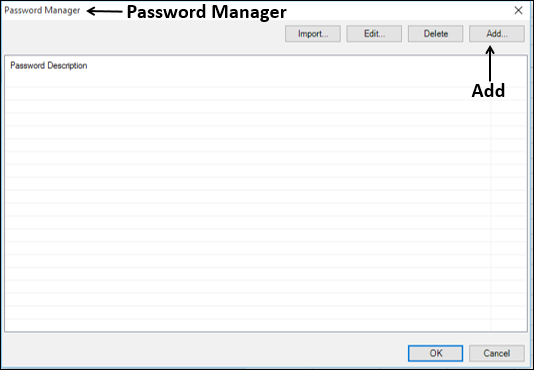
Add password descriptions also, for the passwords you added.
Next time when you need to use any of these files for comparing or analyzing, you do not have to key in the passwords.
Excel Data Analysis — Inquire
You can use Inquire to −
- Compare two workbooks.
- Analyze a workbook for problems or inconsistencies.
- View the links between workbooks.
- View the links between worksheets.
- View the relationships between cells.
- Clean excess cell formatting.
- Manage passwords.
The INQUIRE tab will be on the Ribbon. If you find the INQUIRE tab on the Ribbon, you can skip to the next section.
If you do not find the INQUIRE tab on the Ribbon, make the Inquire Add-in active.
- Click File > Options.
- In Excel Options window, click on Add-Ins.
- In Manage box, click on COM Add-ins.
- Click Go.
COM Add-Ins dialog box appears.
- Check the Inquire box.
- Click OK. Now, Inquire Add-In is active. You will find the INQUIRE tab on the Ribbon.
INQUIRE Commands
Let us learn about the INQUIRE commands.
Click the INQUIRE tab. You will find the following commands −
- Workbook Analysis
- Workbook Relationship
- Worksheet Relationship
- Cell Relationship
- Compare Files
- Clean Excess Cell Formatting
- Workbook Passwords
Comparing Two Workbooks
You can compare two workbooks cell by cell and find the differences, if any, in terms of changes in the second workbook as compared to the first.
Follow the below given steps −
- Open two workbooks that you want to compare.
- Click on INQUIRE tab on the Ribbon.
- Click on Compare Files in the Compare group.
- The Select Files To Compare dialog box appears.
- Check the file names displayed in the boxes next to Compare and To.
- If any File name that is displayed is not the one you wanted, click the down-arrow next to that File name.
Only the workbooks that are open will be displayed.
If the order is not OK, click Swap Files. The order of Files in Compare and To gets changed.
The results of the comparison appear in a two-pane grid −
- The workbook on the left corresponds to the «Compare» file you have chosen.
- The workbook on the right corresponds to the «To» file you have chosen.
Details of changes in workbook-To as compared to Workbook-Compare appear in a pane below these two grids. The changes are highlighted by color, depending on the kind of change. The legend for the highlight colors appears in the lower-left pane.
Click Resize Cells to Fit on the Ribbon to view the cell contents in the Compare and To workbooks. The cells in both the workbooks are resized so that the contents are visible.
Click the Export Results in the Export group on the Ribbon.
The Save As dialog box appears. You can save the results to an Excel workbook. Note that only .xlsx file type is available.
If you need the results in another application, you can do it by copying it to Clipboard.
Click Copy Results to Clipboard in the Export group on the Ribbon.
Paste in an application you want.
Creating an Interactive Report
You can use the Workbook Analysis command to create an interactive report that can show detailed information about the workbook and its Structure, Formulas, Cells, Ranges and Warnings.
- Click the Inquire tab on the Ribbon.
- Click Workbook Analysis in the Report group.
The report will be displayed after the Workbook Analysis is completed.
The Report has the following six categories −
Summary − General information about the structure and content of the workbook.
Workbook (with subcategories) − General workbook statistics.
Formulas (with subcategories) − Specific information about formulae in the workbook.
Cells (with subcategories) − Specific information about cells in the workbook.
Ranges (with subcategories) − Specific information about ranges in the workbook.
Warnings − Several types of warnings about workbook structure and content.
Selecting a category gives you more information about that category.
Check the Formulas option. The sub-categories of formulas will be displayed.
You will observe the following in the workbook that you are analyzing −
- All formulas are 224 in number.
- With numeric values, they are 224 in number.
- Click Sub-Category With numeric values.
In the Results pane, for each of the cells with formula with numeric values, worksheet name, cell address and formula are displayed.
Click the Excel Export button. The Save As dialog box appears.
- Save the Report as an Excel file.
- Load Export File button appears next to Excel Export button.
- Click on Load Export File button.
The saved Report Excel workbook opens and you can clearly view the workbook analysis results.
Viewing with Diagrams
You can view workbook relationships, worksheet relationships and cell relationships with interactive diagrams created by links. The links show the dependencies between the nodes in the diagram. You can drag the links or nodes to arrange them and align them to view whatever you are looking for.
Viewing Workbook Relationships
You can have an interactive, graphical map of workbook dependencies created by connections (links) between files using workbook relationship diagram.
The types of links in the diagram can include other workbooks, Access databases, text files, HTML pages, SQL Server databases and other data sources.
- Click the INQUIRE tab on the Ribbon.
- Click Workbook Relationship in the Diagram group.
The Workbook Relationship Diagram appears, showing links of the workbook with different Data Sources.
Viewing Worksheet Relationships
You can use Worksheet Relationship Diagram to create an interactive, graphical map of connections (links) between worksheets in the same workbook and /or worksheets in other workbooks.
- Click the INQUIRE tab on the Ribbon.
- Click Worksheet Relationship in the Diagram group.
The Worksheet Relationship Diagram appears, showing links between the worksheets in the same workbook, and in other workbooks.
The difference between these two can be identified by the direction of the arrows.
![]()
![]()
Viewing Cell Relationships
You can use the Cell Relationship Diagram to get a detailed, interactive map of all links from a selected cell to cells in other worksheets or even other workbooks.
- Click the INQUIRE tab on the Ribbon.
- Click Cell Relationship in the Diagram group.
The Cell Relationship Diagram Options dialog box appears.
Check Span sheets and Span workbooks.
Select Trace both under Trace cell precedents and Trace cell dependents.
Under Initial number of expansion levels, select limited and type 5 in the box next to it.
The Cell Relationship Diagram appears, showing links between the selected cell and the cells in the same worksheet, same workbook and in other workbooks, based on the options you have chosen.
Click Zoom. You can view the nodes clearly.
Cleaning Excess Cell Formatting
When you find that a workbook is getting loaded slowly, or has become huge in size, it might have formatting applied to rows and/or columns that is not needed (for example, conditional formatting an entire column that has less than 15 values).
You can use the Clean Excess Cell Formatting command to remove excess formatting and greatly reduce the file size. This also results in improving Excel’s speed.
Before cleaning the excess cell formatting, create a backup copy of your Excel file because there are certain cases where this process may increase your file size, and there is no way to undo the change.
- Click the INQUIRE tab on the Ribbon.
- Click Clean Excess Cell Formatting in the Miscellaneous group.
The Clean Excess Cell Formatting dialog box appears. Choose All Sheets in the Apply to box
You will get a message about saving changes. Click OK.
Managing Passwords of Files
If you are using Workbook Analysis or Compare Files commands for workbooks that are password protected, you can avoid having to type the password each time those files are opened. This is possible with using Password Manager.
- Click the INQUIRE tab on the Ribbon.
- Click Workbook Passwords in the Miscellaneous group.
The Password Manager Dialog box appears. Click the Add button to add passwords of your workbooks.
Add password descriptions also, for the passwords you added.
Next time when you need to use any of these files for comparing or analyzing, you do not have to key in the passwords.
Exceltip
Блог о программе Microsoft Excel: приемы, хитрости, секреты, трюки
Надстройка Inquire в excel 2013 — сравнение, анализ и связь файлов Excel
Надстройка Inquire для Excel 2013 позволяет сравнивать и анализировать документы Excel на предмет связей между ними, наличия ошибочных формул и определения различий между файлами формата .xlsx. Давайте рассмотрим моменты, когда вам может пригодится данная надстройка и как ее использовать.
Запуск надстройки Inquire
Надстройка Inquire для Excel идет в комплекте со стандартным набором Excel 2013 и дополнительно скачивать пакеты установки не требуется. Достаточно включить ее в надстройках. Более ранние версии Excel не поддерживают данную надстройку. К тому же на момент написания статьи, надстройка была доступна только на английском языке.
Чтобы запустить Inquire, перейдите по вкладке Файл –> Параметры. В появившемся диалоговом окне выберите вкладку Надстройки, в выпадающем меню Управление выберите Надстройки COM и щелкните кнопку Перейти. Появится окно Надстройки для модели компонентных объектов (COM), где вам необходимо будет поставить галочку напротив Inquire и нажать кнопку ОК.
После запуска надстройки на ленте появится новая вкладка Inquire.
Давайте посмотрим, какие бенефиты дает нам это дополнение.
Анализ рабочей книги
Анализ рабочей книги используется для выявления структуры рабочей книге, формул, ошибок, скрытых листов и т.д. Чтобы воспользоваться данным инструментом, перейдите в группу Report и щелкните кнопку Workbook Analysis. Результат работы надстройки представлен ниже.
Наверняка, многие обратили внимание на пункт Very hidden sheets (Очень скрытые листы). Это не шутка, в Excel действительно можно «хорошо» скрыть лист с помощью редактора VisualBasic. Подробнее об этом мы поговорим в наших последующих статьях.
Связь с рабочими листами
В группе Diagram, присутствует три инструмента определения связей между рабочими книгами, листами и ячейками. Они позволяют указать на отношения между элементами Excel. Данный функционал может быть полезен, когда у вас имеется большое количество ячеек с ссылками на другие книги. Попытки распутать этот клубок могут занять значительное время, тогда как надстройка Inquire позволяет визуализировать зависимость данных.
Чтобы построить диаграмму зависимостей, в группе Diagram выберите один из пунктов WorkbookRelationship, WorksheetRelationship или CellRelationship. Выбор будет зависеть от того, какую зависимость вы хотите увидеть: между книгами, листами или ячейками.
На рисунке ниже вы увидите диаграмму связей между книгами, которую Excel построил, когда я щелкнул кнопку WorkbookRelationship.
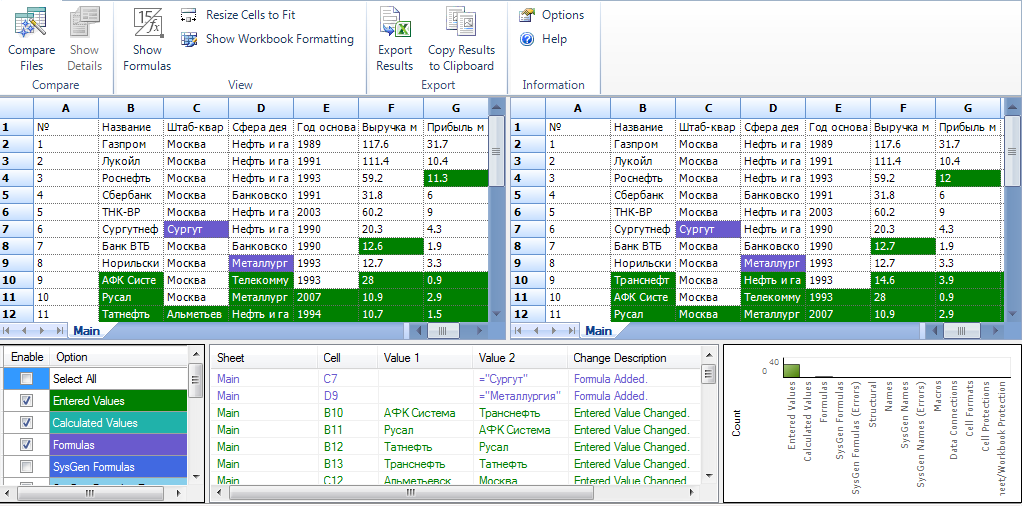
Сравнение двух файлов
Следующий инструмент надстройки Inquire для Excel– Compare– позволяет ячейка за ячейкой сравнивать два файла и указать на все различия между ними. Данный инструмент может понадобится, когда у вас есть несколько редакций одного и того же файла и необходимо понять, какие изменения были внесены в последние версии.
Чтобы воспользоваться данным инструментом вам понадобится два файла. В группе Compare выбираем CompareFiles. В появившемся диалоговом окне необходимо выбрать файлы, которые мы хотим сравнить, и щелкнуть кнопку Compare.
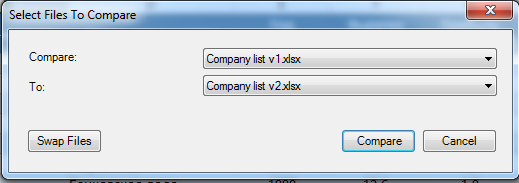
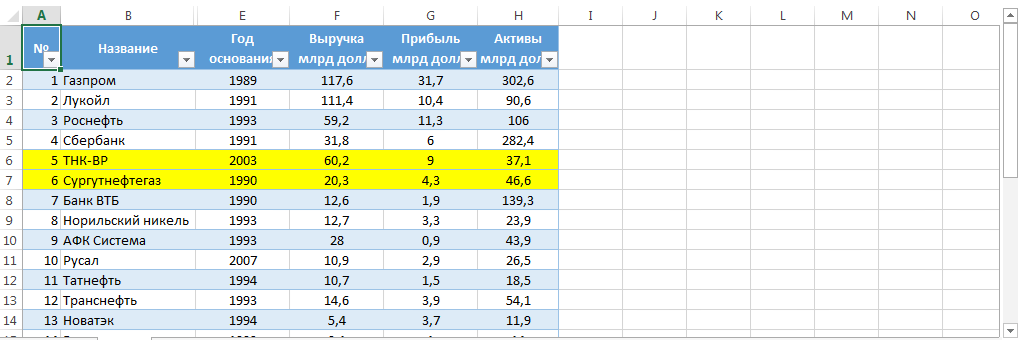
В нашем случае, это два одинаковых файла, в один из которых я преднамеренно внес кое-какие изменения.
После недолгих обдумываний, Excel выдаст результат сравнения, где цветом будут указаны различия между двумя таблицами. При этом цвет ячейки будет различным в зависимости от типа отличия ячеек (различия могут генерироваться из-за значений, формул, расчетов и т.д.).
Очистка излишнего форматирования
Данный инструмент позволяет очистить излишнее форматирование ячеек в книге, к примеру, ячеек, которые отформатированы, но не содержат значений. Инструмент Clean Excess Cell Formatting поможет «любителям» заливать цветом всю строку рабочей книги, вместо заливки определенных строк таблицы.

Чтобы воспользоваться инструментом, перейдите во вкладку Inquire в группу Miscellaneous и выберите Clean Excess Cell Formatting. В появившемся окне необходимо выбрать область очистки излишнего форматирования – вся книга или активный лист – щелкнуть ОК.
Очистка ненужного форматирования позволит снизить размер файла и увеличит производительность работы.
Пароли рабочих книг
Если вы собираетесь анализировать рабочие книги, защищенные паролем, вам необходимо будет указать их в Workbook Passwords.
Надстройка Inquire для Excel содержит несколько интересных инструментов, которые позволят увеличить точность и целостность рабочих книг. Если вы используете Excel 2013, имеет смысл обратить свое внимание на данную надстройку.
Вам также могут быть интересны следующие статьи
2 комментария
У меня следующая проблема
Есть ПЕРВЫЙ файл с прайс листом и необходимыми колонками(Product name/Product code/Description/Category/List price/Quantity/Detailed image), который заливается на сайт. Каждую неделю приходит новый прайс лист(названий столбцов отличаются от тех которые есть в ПЕРВОМ файле) с новыми ценами на товар который есть в старом прайс листе плюс добавляются новые товары которых нет в ПЕРВОМ файле. Нужно сделать так чтобы обновлялись цены и добавлялся новый товар в ПЕРВЫЙ файл с нового. С екселем не очень дружу может кто то подскажет как осуществить эту задумку
Очень полезная статья, помогла сопоставлять прайсы.